
The Joy Max Guide to Growing Tomatoes from Seed
In central Texas, you want to give tomatoes a head start by planting them as transplants as early as possible (protecting from temps below 40º). Growing them indoors from seed is a fun way to spend the winter months.
-
You can definitely wait and buy transplants from nurseries when they become available, but growing them from seed lets you choose the variety, manage their entire lifespan, and gives you a cozy gardening preoccupation through the colder months.
-
You want sterile grow pots (so clean and disinfect them if you’ve used them before) and a sterile seed-starting medium. You’ll most likely need some kind of supplemental light source unless you have a very sunny spot inside, and a heating mat will definitely help your seeds sprout faster.
-
Not gonna lie, it’s easy for things to go wrong with tomato seedlings, but that’s okay! It’s part of learning how to be a gardener. Especially a Texas gardener.
The basics:
1. Start seeds indoors in a sterile seed mixture. Plant 1/8” deep. Using a heat mat will yield much better results. Keep seed pots under a humidity dome and watered from below. Expect 5-7 days until germination. Once sprouted, remove both heat and dome and provide supplemental lighting ever for a bright windowsill, rotating seedling trays to maintain growth straight up as opposed to reaching toward either side. Provide good air circulation to prevent mold and dampness.
2. Repot into larger containers when they are at least 3 inches tall and have their first "true" leaves. These are the second & subsequent sets of leaves that appear. If your planting schedule permits, repot again into a 1 gallon container when seedling is 3x as tall as its container.
3. Harden off outdoors for 1 week.
4. Plant out in the ground in your garden 24-36” apart, burying the stem deeply in the soil (DO NOT DO THAT FOR DETERMINATE TOMATOES). If using a vertical trellis, plants can be spaced closer, 18-24” apart. Tomatoes also do well in containers, especially fabric grow bags. Use a 7+ gallon (for vertically trellised tomatoes) or a 10+ gallon (wide enough for a tomato cage). Providing support for the tomatoes from the beginning will allow for healthier plants and bigger harvests with less work later on.
The Deeper Dive:
When to start indoors
Look up your average last frost date on The Farmer’s Almanac. You want to start your seeds 6-8 weeks before that date or close. Just ask Siri or Alexa (or use a calendar) to figure out the dates. In Central Texas, our last frost date is March 1st. So the ideal time to start your seeds is between January 4th-18th according to that metric but most folks I know start them a little later so that they don’t get too big indoors before it’s warm enough to transplant them out. The end of the month or even early February can work. That still gives you almost 90 days before June arrives, enough to get some harvests before the heat hits.
Planting instructions:
Sow 1/4” deep in individual cells or in a tray of wet but not soggy, sterile seed-starting medium at least an inch deep. This is just the first place they will be growing until their true leaves come in. If you are using a tray, make a furrow with a chopstick or pencil 1/4” deep and then drop in the seeds every half inch. Use your fingers to gently cover the seeds with soil or gently cover them with more seed starting medium.
If using the tray method, I like clam-shell fruit containers as they are vented at the bottom and have a built-in cover. Place them in a seedling tray or a cookie sheet, something with a ridge, so that you can water them by filling the tray not watering from the top. Do this with your planted cells as well. Watering from the bottom will keep you from accidentally drowning your seedlings. Whatever type of planting tray you use, make sure there are holes in it to allow water to escape. Use distilled or at least filtered water. Add water to the bottom tray whenever the soil starts to dry out. You can also use a spray bottle to keep the soil surface moist until your seeds sprout. Drying out completely will kill your seedlings as will being kept too wet. I usually fill the tray every other day, whenever the top inch of the soil is dry. If the water takes longer than a few hours to completely disappear, pour out the remaining water and water less next time. Find the timing to keep the moisture level consistent.

These are Moss Rose seedlings but you get the idea.
Label your seedlings. Getting them mixed up always happens without careful labeling. You may want to also mark their containers, just in case you drop the tray they are in or somehow the markers fall out. This happens more than you’d think.
Place the seedlings on a heat mat if you have one, this will improve and accelerate germination. Keep covered with a humidity dome or a deli tray lid. They do not require light to germinate.
After seedlings start to sprout, prop open your humidity dome to vent. When half of them have germinated, unplug the heat mat and remove the humidity dome. Mold can grow if conditions are too moist. This results in the devastating “damping off” when seedlings die almost overnight, their stems rotting at the soil line. You can give the soil surface a generous sprinkling of cinnamon to prevent mold from forming.
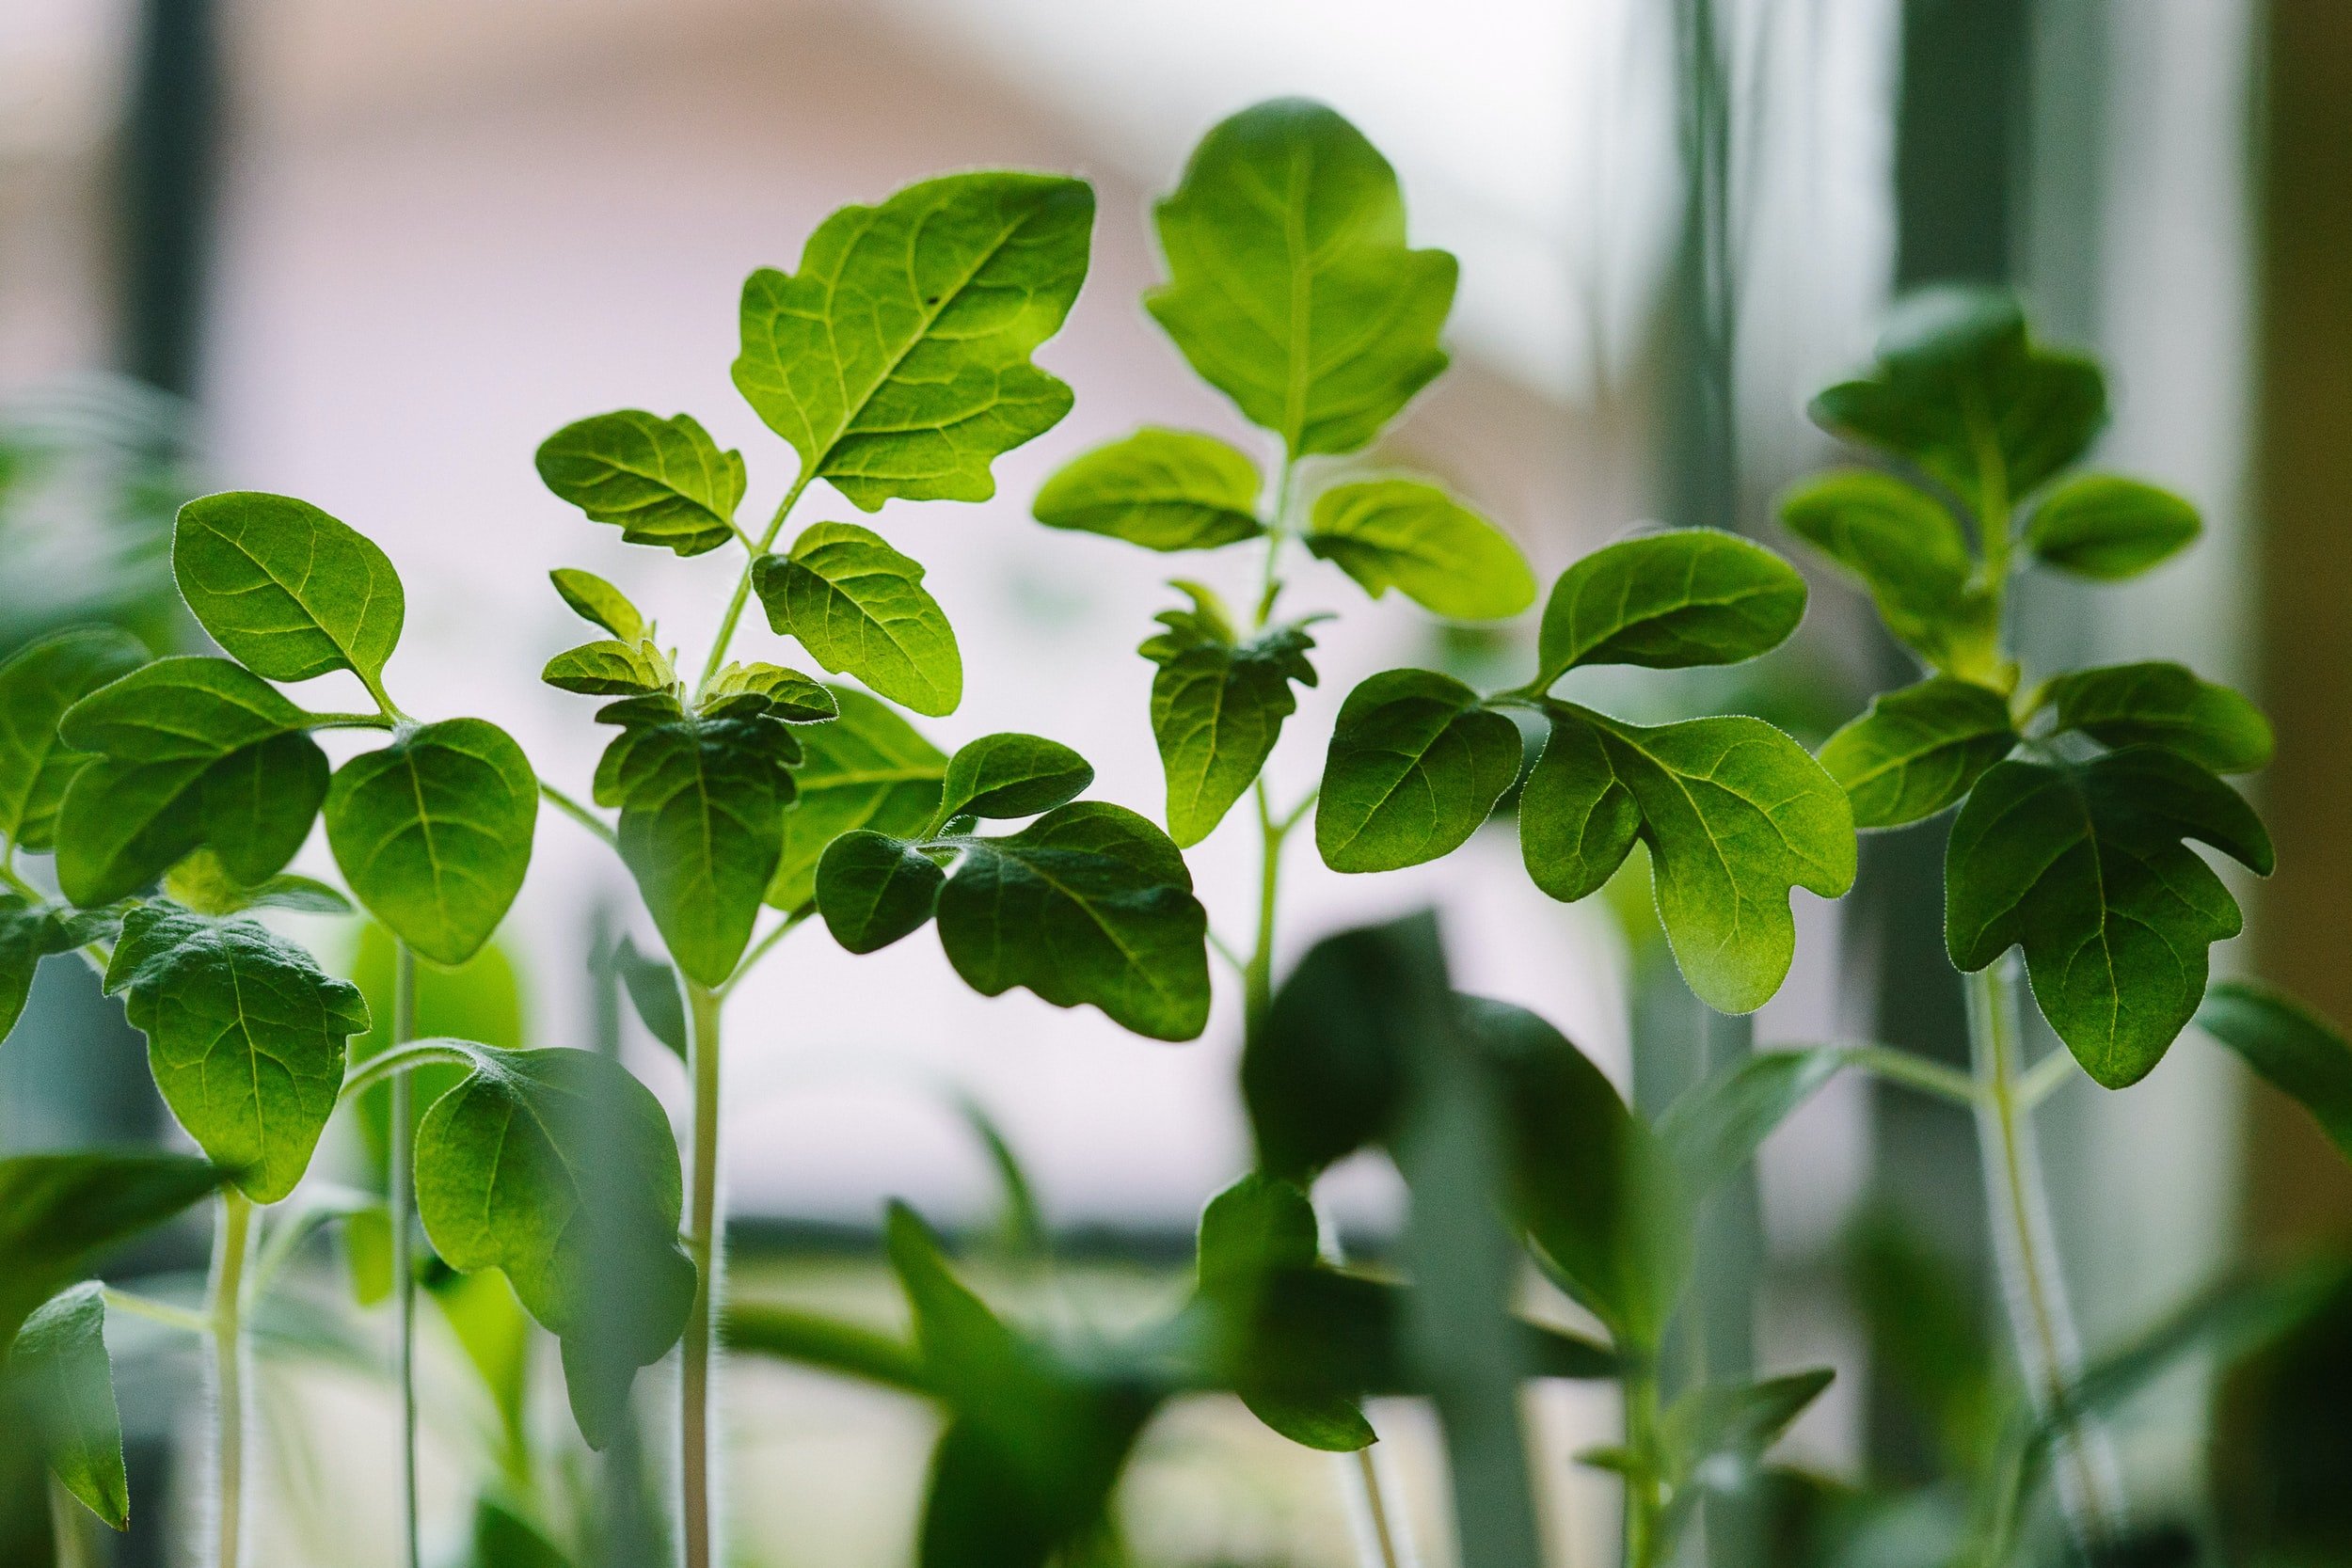
Tomato Seedlings emerge. It’s important they have quality light from their very first moments.
Make sure they have enough light. Grow your seedlings in front of a sunny window and I recommend supplementing natural light with grow lights. Rotate seedling trays as often as twice a day to keep seedlings growing straight up and not becoming leggy. Turn the lights off at night so that they can rest and recharge. Constant light will exhaust them.
Day 7: Seedlings should have germinated. The first leaves that appear are "baby" or "cotyledon" leaves. These are not leaves but are instead embryonic structures that deliver nutrition to the seedling until the roots develop, true leaves appear, and photosynthesis begins. Resist any urges to pluck it off. It is sort of like a belly button. It will drop off when the time is right. REPEAT: DO NOT PICK THEM OFF.
Day 14: Seedlings will be very tiny still but you should be able to tell by their color and sturdiness if they are doing well. If they look sickly, improve their light conditions. If you have multiple seedlings growing in individual cells, thin them at the soil line by snipping with scissors. Tray-grown seedlings can be thinned when transplanting.
Day 30: You should see lots of true leaves coming in.

FIRST TRANSPLANTING:
When all the true leaves have come in, it’s time to transplant them to larger containers. This is especially helpful to tomatoes, as they can grow roots along any part of their stems (adventitious roots). Planting them deep in larger pots, allows their roots to multiply and grow strong. This can make a huge difference in the vigor of your plants. If they have become leggy, it will help them overcome it and become healthy again. They will be better prepared to face wind, drought, pests, and fight off disease.
Time to “prick out” your healthy seedlings. Fill 3-4” containers with moistened potting soil adding compost or granular fertilizer to the mix. Growing tomatoes are very hungry. Make a hole in the center big enough to accommodate a seedling. You may need to use a chopstick to help push the rootball down as far as it will go.
Wet the seedlings' growing medium to make it easier to remove them. Use a fork and try to take as much of the root ball as you possibly can. You may need to gently tease entangled roots apart. Only hold seedlings by the leaves, preferably the baby leaves, not by the stem. If your seedling loses a leaf, it will grow back. If you snap the stem, it will not recover. Drop each seedling in the new container all the way up to the base of the leaves. Gently water and use the water to push the soil in around the stem. You may give them seaweed (just a splash in a gallon of water) for the first time during this step. Water more thoroughly, from the top now, until water runs out of the bottom of the container. You will not need to water as often as before.
“The difference between a bland tomato and great one is immense, much like the difference between a standard, sliced white bread and a crusty, aromatic sourdough.”

Tomato seedlings in their bigger, 4” containers. When their height is three times the height of their new container, either move pot them up one more time, or begin the hardening off process.
In Central Texas, we are racing against the heat of summer. Our next step will be hardening off. If you have a little more time, it is very beneficial to transplant your seedlings again to a 1-gallon pot or better, a 1-gallon fabric grow bag, and even potentially, even one more time to a 3-gallon container, each time burying the stem to the first leaves. Further reduce the frequency of watering, only doing so when the top 2 inches of soil is dry. Many more roots will grow and flourish using this method. Maybe try it for a few of your seedlings just to see how they compare, even if you live in Austin. Choose early varieties to try, such as Moskvich. Save all your discarded soil as you can add it to your garden beds or in your larger containers. Pinch off the lowest two or three branches of leaves so you can plant more of the stem. Keep in mind when handling tomatoes that the stem is always the most vital to the success of the plant. You can trim off bound roots or remove leaves, but try to always protect the main stem from any damage. To help your tomato seedlings get stronger you can gently stroke them with your fingers. Brushing them like this is also super relaxing.
How to harden off
“Hardening off” is the process of acclimating your tender baby seedling to the sun and temperatures outdoors. When your seedling grows to about three times the height of its pot, it's time to move them outside and begin hardening off. This step is crucial to the health of your seedlings. If you are going to plant out before night temps are 55º on average to get a longer harvest window, you will need to bring them in at night or put them in a cold frame as it is too cool if they are not protected. If the temps are right, you can leave them outside. Move into the sun on the first day for only an hour, then move them to indirect sun for the rest of the day. Double the time you leave them in the sun until they reach a full day of sunlight. At that point, you can transplant them to their final spot. If you have consistent dappled sunlight, you can move them there the entire time.
Final transplanting
Choose a location with full sun (6-8 hours). In Austin, morning sun is preferable as afternoon shade will provide relief in the afternoon. Choose a day when there is cloud cover or even light rain for your tender babies to go to their final home. If your indeterminate seedling is taller than 6", remove the lowest branches. Dig a deep hole, then add bone meal, eggshells, compost, and granular fertilizer with a low nitrogen number to the hole. Plant the seedling up to the lowest branches. (Determinate tomatoes should not have their leaves removed or stems buried. Treat them like a little bush). Gently firm the soil down around the stem. Water in thoroughly and gently, adding seaweed or fish fertilizer or a root stimulator to prevent transplant shock. Whisper encouragement. Protect them with row cover if temps are still too cold. When they are still small, build them a tomato cage or set up a vertical support system. Refer to their ultimate size and whether they are determinate, semi-determinate, or indeterminate varieties to provide them adequate support. Those classifications refer to whether they grow to a determined size or if they just keep growing forever. Determinate tomatoes are great for pots on the patio as they grow to smaller, bushier sizes. Their fruit comes in all at once. Indeterminate tomatoes will never stop growing or producing as long as conditions are favorable. They often become quite large. I love growing tomatoes in both raised beds and in fabric grow bags. The latter being great as you can move them to optimal sunlight conditions as the days get hotter and the plants start needing shade from the hot summer sun.
If you had cutworms last year, you will probably have them again. You know them if your seedlings were seemingly mowed down at the soil level. This loss is gutting if you've spent all this time growing seedlings only to lose them overnight. Protect them by buttressing the sides of the stems with bamboo skewers or popsicle sticks. The worms won't be able to wrap around to gnaw through the stems.
Water slowly and deeply avoiding getting the leaves wet. You will probably need to water every two days in the summer and even every day if you are using containers. Drip irrigation is ideal for tomatoes. Putting it on a timer makes it even easier. Add a layer of mulch to protect the soil from moisture loss. I like straw or pine needle mulch. Adding a ton of rotted leaf mulch before covering with the dry mulch will keep them extra happy.
For happy tomatoes, each week give their foliage a treatment. Protect them from pests with insecticidal soap one week, then give them a foliar feeding them with either compost tea or seaweed or fish fertilizer the next. I love my small pressure sprayer for this purpose. When temps get hot, you may need to add 40% shade cloth to protect your plants from direct afternoon sun. Hopefully, you'll have gotten quite a harvest before the heat causes the plants to go dormant until summer ends. If you encounter any problems as your plants grow, consult my guide to common tomato problems and how to solve them.
Good luck and happy growing!