How to Grow Zinnias

Zinnias are THE must-grow summer flower. They were my gateway drug to growing flowers as companions to my spring-planted vegetables and I now cannot imagine a summer without them. They are so easy to grow, so if you’ve never grown flowers from seed before, this is a great one to start with. If you do, please show me your first flower by tagging me on Instagram or sending me an email! I want to share in your triumph!

This is how they looked in March 2019, co-planted with a row of onions on the left and beets & radishes in the rear (the side facing the sun).

And here they are about five weeks later.
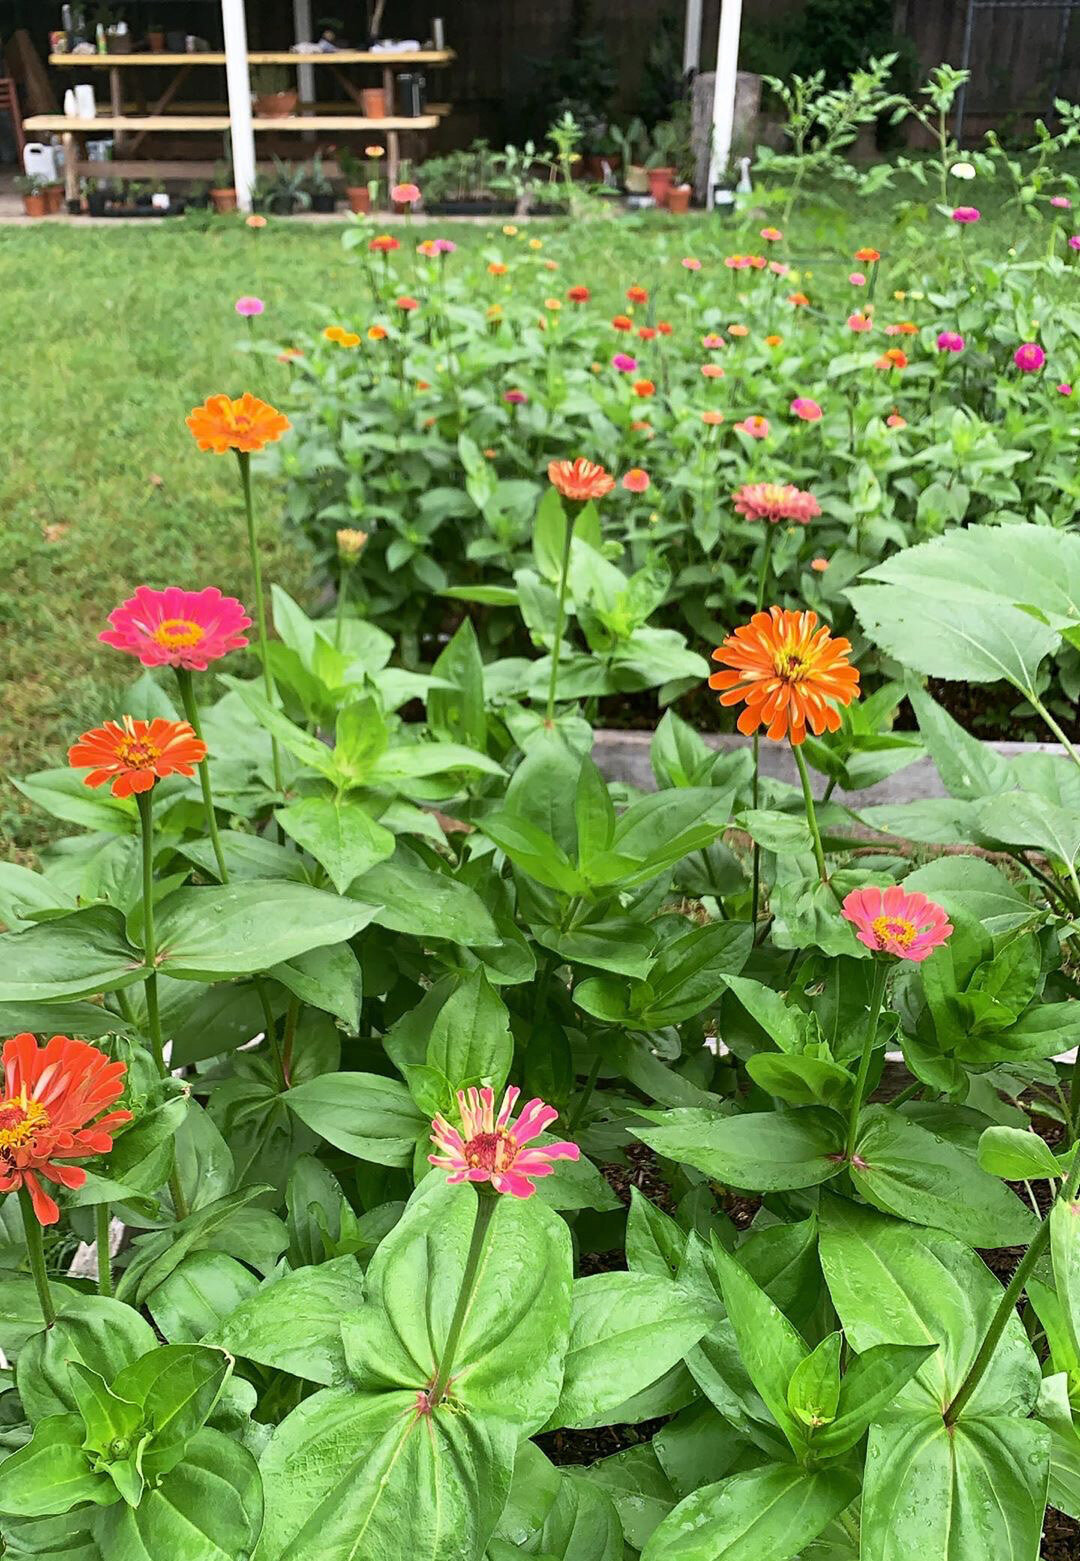
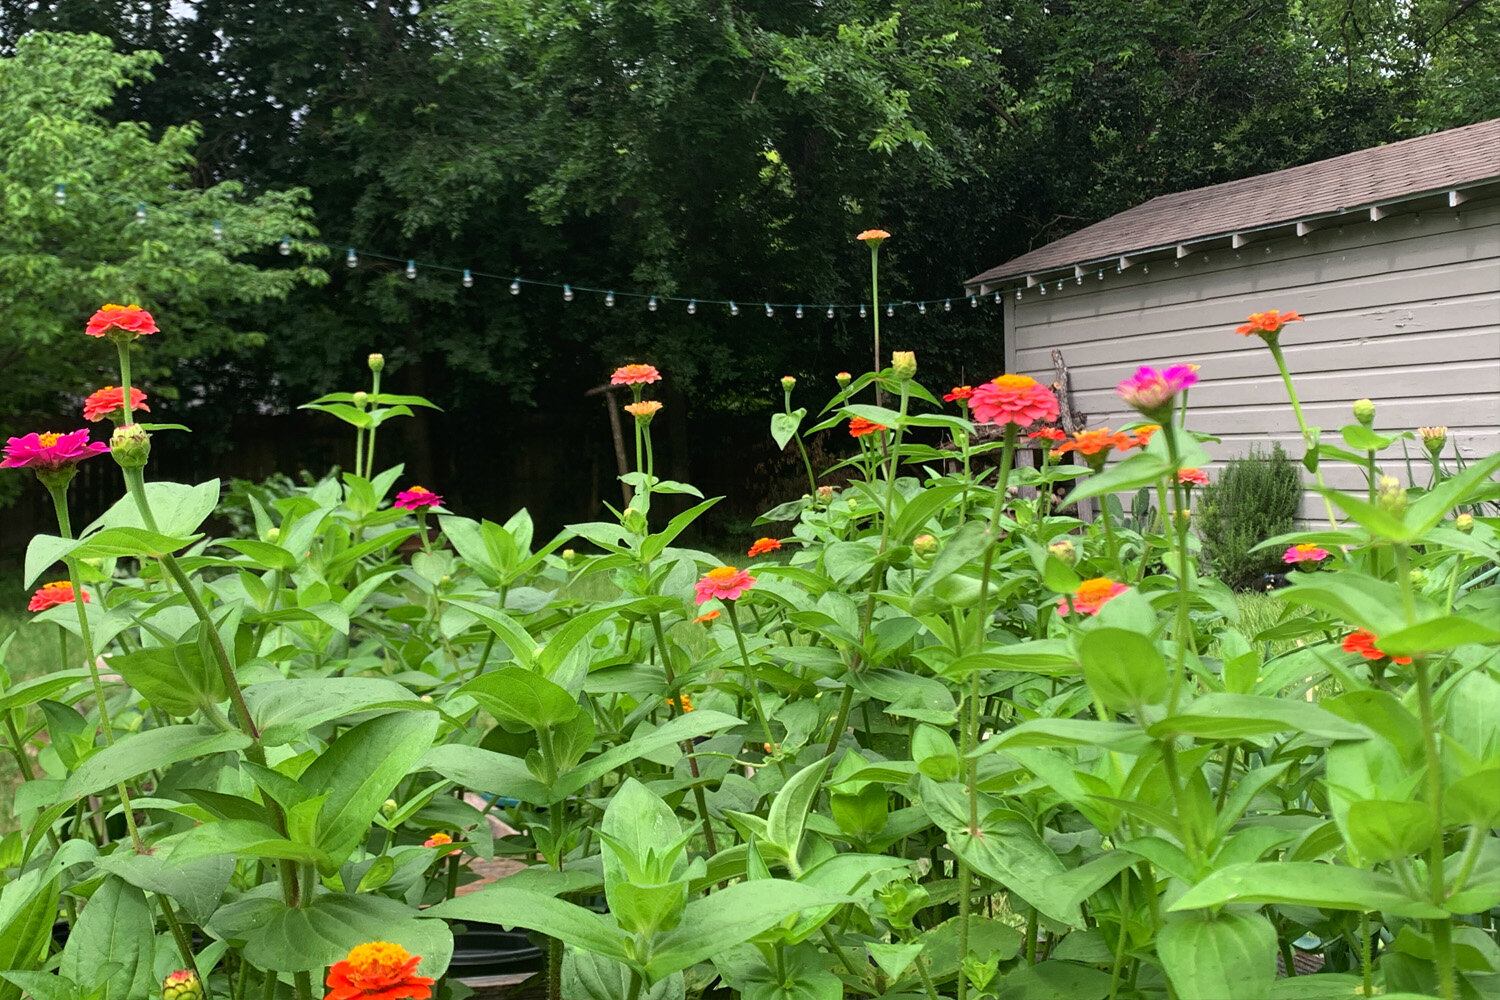
And by mid-summer, they were on full blast. Giant Benary in the foreground.

At the end of the summer when flowers are looking a little worse for wear, I stop watering and cutting them and let the seeds mature. When the flower head is fully dried out, gently pull the seeds out. The seeds that come from the center of the flower are more likely to be pollinated but the arrow-like petal seeds of good size will likely be good too. Separate from the petals and store them in an envelope somewhere cool and dry.
This guide has been amended to reflect questions and comments left by readers. If you have something to share, please comment below! Further reading: I learned so much about growing zinnias from Erin Benzakein of Floret Flowers. She has an excellent guide with loads of photos of different varieties for you to explore.
Everything You Need to Know about Growing Zinnias
You can start them early. If you want to truly have a bounty of zinnias for literally the majority of the year, you can start them when you start your tomatoes and peppers indoors, 4-6 weeks before our last frost. It helps to use a compostable starter that you can plant in the ground when you set them out so you don’t disturb the roots too much. Using a heat mat will help with germination and make sure they have lots of light supplemented with grow lights to keep them growing straight up.
You can also plant them late. You can direct sow zinnia seeds from last frost to the end of June. If you don’t deadhead them, you may see new seedlings pop up in the fall if days remain mild. It is good to sow more seeds every two weeks so that you always have some new blooms coming up. Because there are so many fantastic zinnia varieties, you can plant a rainbow, which is nice because June is Pride month. 🌈
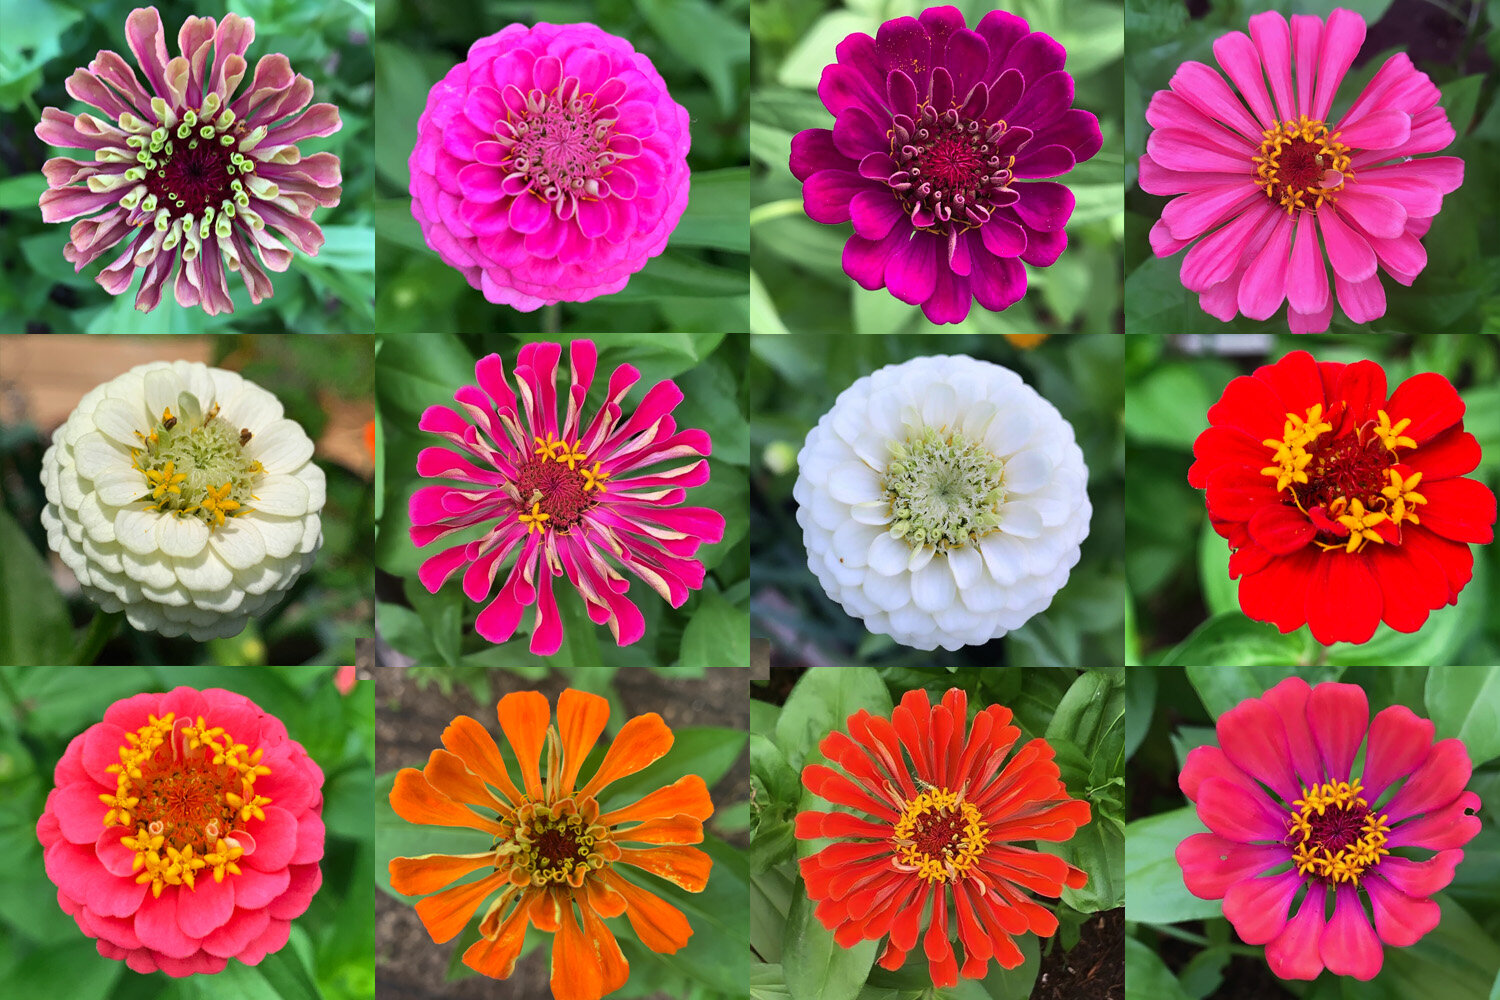
Note the size of the variety you are planting. Benary’s Giant Series can grow 4-5’ tall but you can also find lovely miniature varieties (Lilliput / Thumbelina) for the front of your borders. Plant the taller ones in the back of your garden, shorter ones in the front. You don’t want the tall flowers to block light from any of your shorter plants. The standard zinnia is about 2.5’ tall. I recommend getting seeds as mixed packs with all different colors. Such a joy watching them bud out, each one a surprise. Or if you have a ton of room, you could plant a literal rainbow by planting groupings of different colors all down the line.
Space them at least 9” apart where they will get plenty of sunshine. Trust me on this. Their stems get quite thick and they have a generous amount of leaves so the space between them gets quite dense. Increase the spacing to 12" for the taller varieties. They are very prone to powdery mildew and spacing them at least this far apart allows air to circulate between them, which helps keep them healthy. They also need full sun, but if they get some afternoon shade that’s okay too as they will start wilting once temps reach the high 90sº. Don’t worry though, they’ll recover as soon as the sun passes over them.
Powdery mildew will be an issue. The best way to prevent powdery mildew is to stop it before it starts. Use the all-purpose insect soap recipe to nip it in the bud by spraying your zinnia foliage once a week or so, starting when they are just small seedlings. The baking soda will prevent mildew. If PM does develop, use the treatment until it’s under control and use your fingers to remove any brown, crispy leaves.
Zinnias require moderate water. The absolute best way to water zinnias is with drip irrigation but if you are hand-watering, always water the soil only and avoid getting the leaves wet if you can. Watering in the morning is much better than in the evening as if you did get the plant wet, the water can evaporate before sunset.
“Pinch” them back. What you want to encourage in your zinnias is more of a compact, bushy plant as opposed to a long, lanky one. Cutting them back when they are about a foot tall, tells the plant to send up multiple stems from below where the cut was made, resulting in more blooms throughout the season as well as longer stem length. Cutting them back before they bloom delays the first flowers for 2-3 weeks. If you are growing giant zinnias, cut those back when they get about 18”. This is how to do it: when plants are between 8 to 12 inches tall, take sharp pruners or scissors and snip the top 3 to 4 inches off, just above a leaf node. It feels wrong to cut a strong, healthy plant you want to bloom, but you’ll be amazed how quickly they seem like they weren’t cut at all. They rebound with great vigor and enhanced stability.
Harvest the blooms often. This means tons and tons of bouquets for you and your lucky loved ones. Or in my case, every doctor, dentist, hairstylist, etc. I visit (pre-Covid reference). If you don’t cut the flowers for bouquets, you need to “deadhead” the blossoms once they are spent. Otherwise, the plant will assume it’s finished with its growth cycle and proceed to go to seed and die. If you continually harvest the blooms, your zinnias will produce flowers until killed by frost. All the more reason to keep them free of powdery mildew, as they live for so long as an annual that the base of the flowers can look quite raggedy by the end of the season. It doesn’t affect bouquets though, as you strip those leaves off when assembling the flowers.
Pests They aren’t overly prone to insect damage but super-annoying leaf-footed bugs can sometimes set up shop if you don’t keep an eye out for the nymphs. If you are using the soap spray regularly, this shouldn’t be a problem.
Support them. If you are growing a full bed of zinnias, the easiest way to give them support is to put some netting up while they are still small. They will grow up through it and be secure from wind and rain and their own weight. If you only have a few zinnias, you can support them when they are small with bamboo skewers as needed, and then use larger bamboo stakes as they grow. Or use bamboo stakes and twine to create a grid if they’ve already grown too big to use netting.
They are ready to be cut for bouquets when they pass the “wiggle test.” Grab them about 8” down from the flower and gently shake. If the stem is rigid, they are ready. Loosey-goosey? Not just yet. Also, if your giants have curled flower heads, they are not diseased, they are just still working on straightening out and stretching tall. Be patient with them. Zinnias are considered a “dirty flower” in that they make vase water dirty, so you can either add a drop or two of bleach in with your flower food or change out the water every couple of days. Make sure to add more water every day as zinnias drink a lot of it.